With an assigned partner you will select a piece of photojournalism to research and present to the class. The more well-known the photo the easier your research will be. You and your partner will be creating a Google Drawing that contains your photo and the information you learn about it.
STEP ONE: MEET YOUR PARTNER
You're being assigned a partner for a multitude of reasons, one of which is our need to continue to meet and work with other classmates. No complaining, and no switching. Learn each other's names, and get right to work.
STEP TWO: DECIDE ON A PHOTO TO RESEARCH AND SIGN UP TO CLAIM IT
The photograph needs to be considered photojournalism--it needs to be something newsworthy, something that was in a newspaper or magazine. Well-known photos will have more information, so research will be easier. Plus it'll give us an opportunity to learn about these iconic photos. Below are some suggested photos to take a look at with your partner.
Sports Photos:
http://www.si.com/100-greatest/
Recent News Photos:
2017 https://www.theatlantic.com/photo/2017/12/top-25-news-photos-of-2017/547373/
2016 https://www.theatlantic.com/photo/2016/12/top-25-news-photos-of-2016/509516/
2015 http://www.theatlantic.com/photo/2015/12/top-25-news-photos-of-2015/419184/
2014 http://www.nbcnews.com/storyline/2014-year-in-review/year-pictures-2014-n268806
Older Photos:
STEP THREE: CREATE A SHARED GOOGLE DOC AND BEGIN RESEARCHING
Back at your own seat each of you should become familiar with the story behind the image. Read articles, cross-reference your facts on multiple sites to ensure their validity, and add notes to your Doc. You will need to be well-informed about your image, and will select the 5 most important facts to include on your final project. A few things to look for:
*Copy and paste all sources onto your Doc.
STEP FOUR: SKETCH OUT YOUR DIGITAL POSTER AND DECIDE TOGETHER WHICH INFO MAKES THE CUT
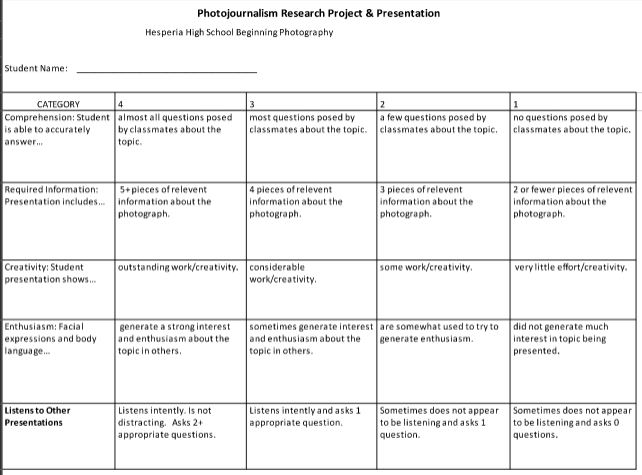
Review the sample in the classroom as well as the rubric below to make these decisions. Do you have enough facts? What will get you your "Creativity Points"? (see rubric)
STEP FIVE: CREATE A SHARED GOOGLE DRAWING AND ADD YOUR INFO, PICS, ETC.
Make it look good. Don't overcrowd the poster with lots of words--less is more. Look for high quality images.
STEP SIX: PLAN FOR YOUR PRESENTATION AND HAND IN DOC AND DRAWING
Review your info, the story of your image, who will say what in the presentation, etc. Be prepared. Hand in your Doc of notes and sources and your final Drawing so that I have them to project when you're presenting.
STEP SEVEN: PRESENT, ANSWER QUESTIONS, & LISTEN WHILE OTHERS PRESENT
During your presentation speak loudly and enthusiastically. After you share your story and image the class will ask you questions--it's required. Be prepared to answer questions. You don't have to know every single minute detail about your photo, but you should know more than what you wrote on your poster. Answer to the best of your ability and be polite. Before and after your presentation you're still being graded based on how well you listen to others. You also need to ask questions after other people's presentations--it's required.
STEP THREE: CREATE A SHARED GOOGLE DOC AND BEGIN RESEARCHING
Back at your own seat each of you should become familiar with the story behind the image. Read articles, cross-reference your facts on multiple sites to ensure their validity, and add notes to your Doc. You will need to be well-informed about your image, and will select the 5 most important facts to include on your final project. A few things to look for:
- Who took the photo
- Who is in the photo
- What is happening
- What led up to this event
- What (if any) was the public reaction to the photo
- Where was the photo taken
- When was the photo taken
- Why is the photo important
- How does the photo affect our understanding of the event
*Copy and paste all sources onto your Doc.
STEP FOUR: SKETCH OUT YOUR DIGITAL POSTER AND DECIDE TOGETHER WHICH INFO MAKES THE CUT
Review the sample in the classroom as well as the rubric below to make these decisions. Do you have enough facts? What will get you your "Creativity Points"? (see rubric)
STEP FIVE: CREATE A SHARED GOOGLE DRAWING AND ADD YOUR INFO, PICS, ETC.
Make it look good. Don't overcrowd the poster with lots of words--less is more. Look for high quality images.
STEP SIX: PLAN FOR YOUR PRESENTATION AND HAND IN DOC AND DRAWING
Review your info, the story of your image, who will say what in the presentation, etc. Be prepared. Hand in your Doc of notes and sources and your final Drawing so that I have them to project when you're presenting.
STEP SEVEN: PRESENT, ANSWER QUESTIONS, & LISTEN WHILE OTHERS PRESENT
During your presentation speak loudly and enthusiastically. After you share your story and image the class will ask you questions--it's required. Be prepared to answer questions. You don't have to know every single minute detail about your photo, but you should know more than what you wrote on your poster. Answer to the best of your ability and be polite. Before and after your presentation you're still being graded based on how well you listen to others. You also need to ask questions after other people's presentations--it's required.